Tutorial on LLRGs#
Although most LLRGs are straightforward, there are still some LLRGs that take a long time to understand. This is a tutorial to correctly use different LLRGs to simulate different sequencers. We assume that you had already read Quickstart.
Here we would demonstrate features of commonly used LLRGs using mitochondria of C. Elegans.
Introduction#
Low-Level Read Generators (LLRGs) are programs used to generate machine errors. Normally, an LLRG can be represented in 2 forms: As a standalone third-party executable (e.g., PBSIM can be invoked by pbsim command) or as a Python module that can be imported (e.g., dTGS). These two forms are unified by the introduction of what we called “LLRG adapter”, a middleware inside YASIM that performs execution and error handling of LLRGs. The LLRG adapters are evoked by the LLRG frontend (i.e., the python -m yasim [LLRG] command) in bulk or single-cell RNA-Seq experiments. Following is a workflow of the LLRG step:

LLRG Step Flow Chart#
This figure demonstrates the basic workflow of the LLRG step. It is, in details, as follows:
The input cDNA sequences and depths are separated by isoform’s transcript ID.
For each transcript, its cDNA sequence and depth are passed into LLRG adapter, which performs DNA-Seq on those cDNAs and generates reads in FASTQ format.
The LLRG adapters are executed in parallel.
Generated reads would be merged into one (SE) or two (PE) files.
So after knowing this knowledge, it would be easy to decode LLRG parameter specifications. Firstly, we would stress that the arguments marked in braces should be filled by the user (e.g., please replace [FASTAS_DIR] with the path of the FASTA directory generated in transcribe step). So, to invoke LLRG adapter for [LLRG], you should at least:
python -m yasim [LLRG] \
    -F [FASTAS_DIR] \
    -d [ISOFORM_DEPTH] \
    -o [OUTPUT_NAME] \
where [LLRG] is the name of the LLRG you wish to use, [ISOFORM_DEPTH] is the path to isoform-level depth generated in previous steps, and [OUTPUT_NAME] is a basename to output which is interpreted as [OUTPUT_NAME].fq for single-end reads and [OUTPUT_NAME]_1.fq & [OUTPUT_NAME]_2.fq for pair-end reads.
Among all possible optional parameters, the most important are --simulator_name and -e. The former specifies what would appear in FASTQ SEQID, and the latter specifies the path to the LLRG executable. For example, if you installed PBSIM3 in /usr/local/bin/pbsim3 instead of normal locations, you should specify -e /usr/local/bin/pbsim3.
Compared to NGS simulators, TGS simulators support two additional parameters: --truncate_ratio_3p and --truncate_ratio_5p. These two parameters specify 3’ and 5’ truncation where 3’ and 5’ are IN RESPECT TO SEQUENCER. For example, suppose that an isoform is defined on the forward strand. PBSIM1 would take its cDNA (on the forward strand) and generate reads in both the forward strand and reverse strand. At this time, if we specified a 3’ truncation, the forward cDNA-Seq read would be clipped on the 3’ end while the reverse cDNA-Seq strand would be clipped on the 5’ end to the reference genome.
The argument parser of the LLRG front end supports pass-through. That is, arguments or options that cannot be recognized would be applied to all LLRG. For example, if we wish to adjust the accuracy of PBSIM, we can add --accuracy-mean [VALUE] parameter at the end of python -m yasim pbsim ... command. Since --accuracy-mean is not a recognizable parameter of YASIM, it would be passed to all pbsim processes.
Preparations#
Here generate all steps before proceeding into LLRG. It would download the ce11 reference genome sequence and annotation from UCSC and generate sequencing depth using V3API. Note that the generation of AS events is optional so not used.
To interactively see LLRG simulation statistics, the following Python modules are imported:
Show code cell source
import os

import pandas as pd
import seaborn as sns
import matplotlib.pyplot as plt
ART#
ART (Official site at NIEHS) is a general-purpose NGS DNA-Seq simulator. YASIM uses ART’s Illumina mode (Executable art_illumina) 2.5.8 (June 6, 2016).
- Reference
W. Huang, L. Li, J. R. Myers, and G. T. Marth, “Art: A next-generation sequencing read simulator.,” Bioinformatics (Oxford, England), vol. 28, pp. 593–594, 4 Feb. 2012, ISSN: 1367-4811. DOI: 10.1093/bioinformatics/btr708
- Installation
From Conda. If you use Debian GNU/Linux-based distributions, you may also use APT.
Specify ART Sequencer Model and Read Length#
The output of python -m yasim art --help may be hard to read, and we would explain it here. Although ART can simulate Illumina sequencers with different models and read lengths, the choices of read length are limited by the choice of models. For example, if we choose Illumina GenomeAnalyzer I (GA1 as is in the parameter), the valid read length would be 36 or 44. If the read length is not valid or not specified, the default read length (the first valid read length) would be used.
Following is a table of supported ART sequencers and read length:
Show code cell source
from yasim.llrg_adapter.art import AVAILABLE_ILLUMINA_ART_SEQUENCER
art_compatibility_matrix = pd.DataFrame(AVAILABLE_ILLUMINA_ART_SEQUENCER).transpose()
art_compatibility_matrix.columns = ("Real Name", "Allowed Read lengths")
art_compatibility_matrix
| Real Name | Allowed Read lengths | |
|---|---|---|
| GA1 | GenomeAnalyzer I | [36, 44] |
| GA2 | GenomeAnalyzer II | [50, 75] |
| HS10 | HiSeq 1000 | [100] |
| HS20 | HiSeq 2000 | [100] |
| HS25 | HiSeq 2500 | [125, 150] |
| HSXn | HiSeqX PCR free | [150] |
| HSXt | HiSeqX TruSeq | [150] |
| MinS | MiniSeq TruSeq | [50] |
| MSv1 | MiSeq v1 | [250] |
| MSv3 | MSv3 - MiSeq v3 | [250] |
| NS50 | NextSeq500 v2 | [75] |
So, for example, to simulate single-end (SE) HiSeq 2500 with 150 read length, you need to:
python -m yasim art \
    -F [FASTAS_DIR] \
    -d [ISOFORM_DEPTH] \
    -o [OUTPUT_NAME] \
    --sequencer_name HS25 \
    --read_length 150
ART: Supporting Pair-End (PE) Mode#
ART also supports pair-end (PE) simulation. Under that circumstance, one additional flag, --is_pair_end, needs to be set and two additional parameters, --pair_end_fragment_length_mean (mean distance between two fragments) and --pair_end_fragment_length_std (standard deviation of the distance between two fragments), needs to be specified. You’re recommended to set --pair_end_fragment_length_mean larger than read length with --pair_end_fragment_length_std smaller than read length.
Debugging ART LLRG#
ART may raise some errors like:
OpenBLAS blas thread_init: pthread_create failed for thread 14 of 128: Resource temporarily unavailable
OpenBLAS blas thread init: RLIMIT_NPROC 4096 current, 2061441 max
Solve this error by setting the -j parameter to a smaller value or wait until the server becomes less busy.
PBSIM#
Warning
The official build of PBSIM, PBSIM2 and PBSIM3 shares a common executable anme (pbsim) but with different argument layout. For convenience, I renamed executable of PBSIM2 to pbsim2 and PBSIM3 to pbsim3. If you do not use this in your computer, please use the -e option.
PBSIM version 1 (Official site at GitHub) can simulate C1/C2 chemistry data generated by PacBio RS, a very old sequencer that is not commonly seen nowadays.
- Reference
Y. Ono, K. Asai, and M. Hamada, “Pbsim: Pacbio reads simulator–toward accurate genome assembly.,” Bioinformatics (Oxford, England), vol. 29, pp. 119–121, 1 Jan. 2013, ISSN: 1367-4811. DOI: 10.1093/bioinformatics/bts649
- Installation
From Conda. If you use Debian GNU/Linux-based distributions, you may also use APT.
PBSIM CCS Mode#
PBSIM has a CCS mode. You can use this mode by specifying the --ccs flag.
Warning
PBSIM generates CCS with a mechanism similiar to CLR. It does NOT require invocation of PacBio ccs utility. It would NOT generate PacBio IsoSeq-compatible HiFi BAM files.
PBSIM2#
PBSIM2 (Official Site at GitHub) can simulate early PacBio RS II (P4C2, P5C3, and P6C4 chemistry) and ONT (R9.4, R9.5, and R10.3 pore) models. It does NOT support CCS generation.
Using PBSIM2 for TGS simulation is recommended. It is fast, reliable, and accurate.
- Reference
Y. Ono, K. Asai, and M. Hamada, “PBSIM2: A simulator for long-read sequencers with a novel generative model of quality scores,” Bioinformatics (Oxford, England), vol. 37, no. 5, pp. 589–595, May 5, 2021, Number: 5, ISSN: 1367-4811. DOI: 10.1093/bioinformatics/btaa835
- Installation
From Conda
PBSIM3#
PBSIM3 (Official Site at GitHub) is one of the most complicated LLRGs used in this software. It can be used to simulate PacBio Sequel and RS II reads with true CCS support.
- References
Y. Ono, M. Hamada, and K. Asai, “Pbsim3: A simulator for all types of pacbio and ont long reads.,” NAR genomics and bioinformatics, vol. 4, lqac092, 4 Dec. 2022, ISSN: 2631-9268. DOI: 10.1093/nargab/lqac092
- Installation
From Conda
PBSIM3 Simulation Strategy#
PBSIM3 has 2 strategies: wgs and trans. Their difference is as follows:
The
wgsstrategy is the same as what is used in PBSIM2, PBSIM, and other LLRGs. i.e., PBSIM3 was used as a DNA-Seq simulator that reads cDNA and outputs sequences. Example:python -m yasim pbsim3 \ -m SEQUEL \ -M errhmm \ --strategy wgs \ -F chrm_trans.fa.d \ -d isoform_depth.tsv \ -o chrm_pbsim3_wgs \ -j 40
The
transstrategy is new in PBSIM3. It would generate reads based on a new PBSIM3-specific isoform record format. In YASIM, this mode sets the number of reads on forward (i.e., true mRNA) reads to the desired number, and the number of reads on the reverse (i.e., reverse-complemented mRNA) reads to 0 to mimic direct RNA sequencing. Example:python -m yasim pbsim3 \ -m SEQUEL \ -M errhmm \ --strategy trans \ -F chrm_trans.fa.d \ -d isoform_depth.tsv \ -o chrm_pbsim3_trans \ -j 40
PBSIM3 HMM Method#
PBSIM3 have 2 HMM method: Error HMM and Quality Score HMM. Please refer to the paper for more details. An apparent difference is that the former would not generate meaningful quality scores in output FASTQ (all zero). See the following example:
python -m yasim pbsim3 \
    -m RSII \
    -M errhmm \
    --strategy trans \
    -F chrm_trans.fa.d \
    -d isoform_low_depth.tsv \
    -o chrm_pbsim3_errhmm \
    -j 40
python -m yasim pbsim3 \
    -m RSII \
    -M qshmm \
    --strategy trans \
    -F chrm_trans.fa.d \
    -d isoform_low_depth.tsv \
    -o chrm_pbsim3_qshmm \
    -j 40
python -m labw_utils.bioutils describe_fastq chrm_pbsim3_errhmm.fq chrm_pbsim3_qshmm.fq
Plotting of mean quality score per read.
Show code cell source
pbsim3_errhmm_fq_stats = pd.read_table(
    os.path.join("chrm_pbsim3_errhmm.fq.stats.d", "all.tsv"),
    quotechar="'"
)
pbsim3_qshmm_fq_stats = pd.read_table(
    os.path.join("chrm_pbsim3_qshmm.fq.stats.d", "all.tsv"),
    quotechar="'"
)
fig, axs = plt.subplots(nrows=2, sharex=True)
_ = sns.histplot(pbsim3_errhmm_fq_stats, x="MEANQUAL", ax=axs[0])
_ = sns.histplot(pbsim3_qshmm_fq_stats, x="MEANQUAL", ax=axs[1], binwidth=1)
_ = axs[0].set_title("errhmm mode")
_ = axs[1].set_title("qshmm mode")
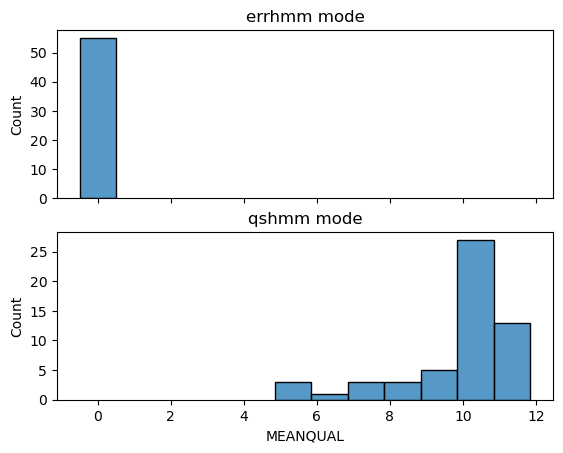
The QSHMM does not support the PacBio Sequel model since they do not have sequence quality information.
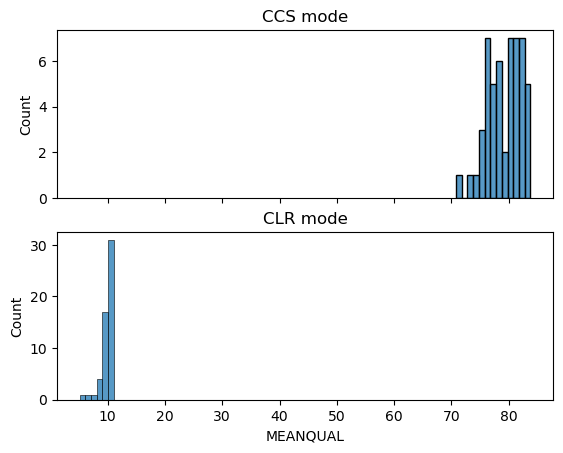
PBSIM3 CCS Mode#
Circular Consensus Sequence (CCS)/HiFi Reads are commonly used in PacBio sequencing as it provides users with higher accuracy that is comparable to NGS reads. See their official site for more details.
YASIM can generate CCS FASTQ. The --ccs_pass parameter determines the number of passes to perform when simulating CCS reads. To simulate CLR reads, do not set --ccs_pass or set --ccs_pass to 1. If this parameter is set to another value, simulated data would be in CCS.
On CCS generation, YASIM would firstly invoke PBSIM3 to generate PacBio CLR reads, and then call CCS using the ccs utility (which is slow) from PacBio. The MAF generated in CCS mode is paired with generated CLR reads and cannot reflect the error status of generated CCS reads.
CCS generation requires samtools and ccs to be present. You may set their path in corresponding parameters. For the IsoSeq-based pipeline that requires CCS BAM, please refer to the appendix. 3’ and 5’ truncation set in YASIM parameters are applicable for CCS FASTQ but not applicable to CCS BAM. Install them using:
conda install -c conda-forge -c bioconda pbccs samtools
You are also recommended to install jinja2 and pysam, with which YASIM can utilize XML API of ccs as-is recommended by PacBio with a more accurate empty-file detection. Installation of those tools can be done by:
pip install yasim[pbsim3]==3.2.0
See the following example for details:
python -m yasim pbsim3 \
    -m RSII \
    -M qshmm \
    --strategy trans \
    -F chrm_trans.fa.d \
    -d isoform_low_depth.tsv \
    -o chrm_pbsim3_clr \
    --ccs_pass 1 \
    -j 40
python -m yasim pbsim3 \
    -m RSII \
    -M qshmm \
    --strategy trans \
    -F chrm_trans.fa.d \
    -d isoform_low_depth.tsv \
    -o chrm_pbsim3_ccs \
    --ccs_pass 10 \
    -j 40
python -m labw_utils.bioutils describe_fastq chrm_pbsim3_clr.fq chrm_pbsim3_ccs.fq
Plotting of mean quality score per read.
Show code cell source
pbsim3_ccs_fq_stats = pd.read_table(
    os.path.join("chrm_pbsim3_ccs.fq.stats.d", "all.tsv"),
    quotechar="'"
)
pbsim3_clr_fq_stats = pd.read_table(
    os.path.join("chrm_pbsim3_clr.fq.stats.d", "all.tsv"),
    quotechar="'"
)
fig, axs = plt.subplots(nrows=2, sharex=True)
_ = sns.histplot(pbsim3_ccs_fq_stats, x="MEANQUAL", ax=axs[0], binwidth=1)
_ = sns.histplot(pbsim3_clr_fq_stats, x="MEANQUAL", ax=axs[1], binwidth=1)
_ = axs[0].set_title("CCS mode")
_ = axs[1].set_title("CLR mode")
DWGSIM#
DWGSIM (Official Site at GitHub) is an NGS simulator. YASIM uses its illumina PE mode.
Badread#
Badread (Official site at GitHub) is a TGS simulator implemented in Python. It can be used to simulate various PacBio and ONT models (trained on unknown data so pore/chemistry information is unavailable) Compared to other simulators, it is relatively slow.
- References
R. Wick, “Badread: Simulation of error-prone long reads,” Journal of Open Source Software, vol. 4, no. 36, p. 1316, Apr. 2019. DOI: 10.21105/joss.01316
- Installation
From Conda.
dTGS#
dTGS (Dumb TGS) is a TGS simulator that outputs all given contig with given depth times without any error (Phread33 score K, the highest one). It is ultra-fast and accurate but without biological meanings.
- Reference
Unpublished.
- Installation
No installation is needed.
Appendices#
Interpretation of LLRG Exceptions#
After each simulation, the LLRG adapter would print a line like this: 2023-04-03 15:16:41,070 [INFO] Status of errors: {'NORMAL': 5, 'LLRGFail': 6}. This line indicates LLRG exception status. Below are the definitions of commonly seen exceptions:
NORMAL: If no exception occursEmptyOutFile: If LLRG exited normally but with an empty output file.NoOutputFile: If LLRG exited normally but with no output file.LLRGFail: If LLRG exited abnormally.InitFail: if pre-execution of initialization hook failed.UNKNOWN: Other errors.

Some LLRGs cannot accept depth less than 1. If so, please use --low_cutoff while generating gene- and isoform-level depth files.
Hint on Management of LLRGs#
You may use wrapper scripts for LLRGs that require complex prerequisites.
Following is a wrapper for Badread. This script would:
Search for
badreadexecutable. If succeeded, would execute that executable.Search for
badreadConda environment. If succeeded, would activate that environment and usebadreadexecutable inside.Set up
badreadConda environment and usebadreadexecutable inside.
#!/usr/bin/env bash
set -e
if which badread &>> /dev/null; then
    exec badread "${@}"
fi
if ! which conda &>> /dev/null; then
    echo "conda not found!" >&2
    exit 127
fi

if ! conda env list | grep ^badread &>> /dev/null; then
    conda create -y -n badread -c bioconda badread=0.2.0 python-edlib
fi

eval "$(conda 'shell.bash' 'hook' 2> /dev/null)"
conda activate badread
exec badread "${@}"